Running a Go Debugger in Kubernetes
Marvin Beckers
October 8, 2023
(Note: This blog post is a written version of my talk Ephemeral Containers in Action - Running a Go Debugger in Kubernetes. Slides and recordings are available in the linked repository.)
Identifying bugs in our code can be hard; really hard. In complex microservice environments, it can be even harder, since reproducing the exact request flow which triggered a bug can be quite the challenge. Thankfully the modern observability stack can be quite helpful in the matter.
But sometimes extended observability might not be available or it’s still not enough to identify the problematic code path. In those cases I like to break out a proper debugger, set specific breakpoints and investigate the program’s state at those breakpoints.
But how do we run a debugger within Kubernetes, where our application actually lives? We do not want to run our application with active debugging all the time! Not a problem (anymore)! We can utilize ephemeral containers. It will allow us to launch a debugger into an existing Pod on demand.
Before going into the details, let’s review what debugging actually is and what considerations we need to be aware of when debugging Go applications.
Basics of debugging (Go)
Debugging is a long-standing staple of software development. If it is not part of our development toolbox yet, it might be worth looking into it. print based debugging sometimes has lower friction, but knowing how to use a debugger is a powerful skill.
For Go, the go-to debugger is, without a doubt, Delve. Delve is a debugger specific to Go and has been around for years. While using GBD is possible, the official Go documentation recommends using Delve when possible. For some basics of debugging Go applications with Delve, there is an article available from golang.cafe that serves as a good introduction.
The gist however is that debuggers allow to inspect application state during code execution. We can set breakpoints and look at variable contents when that breakpoint is hit. In Go, specifically, it is also possible to inspect Goroutines.
This means debuggers are incredibly powerful in identifying faults in code since the whole state can be inspected at any given time. Once set up, effective debugger usage beats print-style debugging by a mile or two.
Let’s take a look at the requirements to run a debugger.
Linux capabilities
While interacting with the operating system, we often interact with kernel APIs. For this article we will take a quick look at the Linux kernel in specific, but similar concepts probably exist in the operating system of our choice. They do not overlap 100%, but they are probably close enough.
In Linux, there is a concept called capabilities. Capabilities are assigned to a process and allow to interact with certain functionality of the kernel. This enables more granular permissions than running a process as a super user.
For debuggers, a specific capability is usually required - CAP_SYS_PTRACE - because it unlocks calling the ptrace system call. Debuggers need this to attach to running processes and to interact with their memory and registers. It essentially allows us to “take control” of an already running process.
That is a scary-looking system call and there is good reason this is locked by a capability. But we need it! As a Linux user, we might not see this level of detail (and maybe run the debugger via sudo) but since we are thinking of running a debugger in Kubernetes, we need to be aware of this. A container in Kubernetes does not have this capability by default. Let’s keep this in mind, it will come up later again.
Go compile flags
Debuggers usually require a certain level of information encoded in the binary that they try to debug. This means that the “production” build of our application binary might not be suitable for debugging.
To determine this, we can look at how our binaries are built, e.g. in a Makefile or Dockerfile. If the following flags are present in go build’s -ldflags we definitely need a separate debug build:
-s: Omit the symbol table and debug information.-w: Omit the DWARF symbol table.
Both flags allow us to optimize the binary size at the expense of debug information, which is usually what we want for production builds. If this is the case, a separate image needs to be provided that does not have those flags set. Otherwise, the application cannot be debugged. This also means that we will need to launch a separate application Pod with the debug-enabled application build. More on that later.
In addition, some flags can be helpful for debugging. Since we rely on line numbers to set breakpoints, we need to make sure that our code is not optimized by the compiler. This can happen if the compiler recognizes code patterns that can be simplified. Some parts of the code might therefore be changed and cause issues with debugging, although optimized code is generally considered okay (with some pitfalls).
Code optimization can be disabled if required by passing additional flags:
$ go build -gcflags="all=-N -l"
This will pass two flags to the Go compiler for all invocations. The flags being
-N: Disable optimizations.-l: Disable inlining.
We should be careful with these flags though, since the compiler usually has some pretty good ideas about optimizing code. Let’s only add them if debugging gives us unexpected results or errors when trying to set breakpoints.
Remote debugging
Now we have established debugging as a concept - But so far, we have been talking about attaching ourselves to processes on the system. Which obviously means that we need to be on the same (virtual) machine. But if the application is running within Kubernetes, it would be nice to be able to debug from the comfort of our laptop.
Thankfully, the Debug Adapter Protocol exists to help us out. Developed for Visual Studio Code to have a standardized protocol to interact with so-called debug adapters (intermediate layers that translate between a client and the actual debugger), it has seen solid adoption and will help us out here (even if we do not use VS Code).
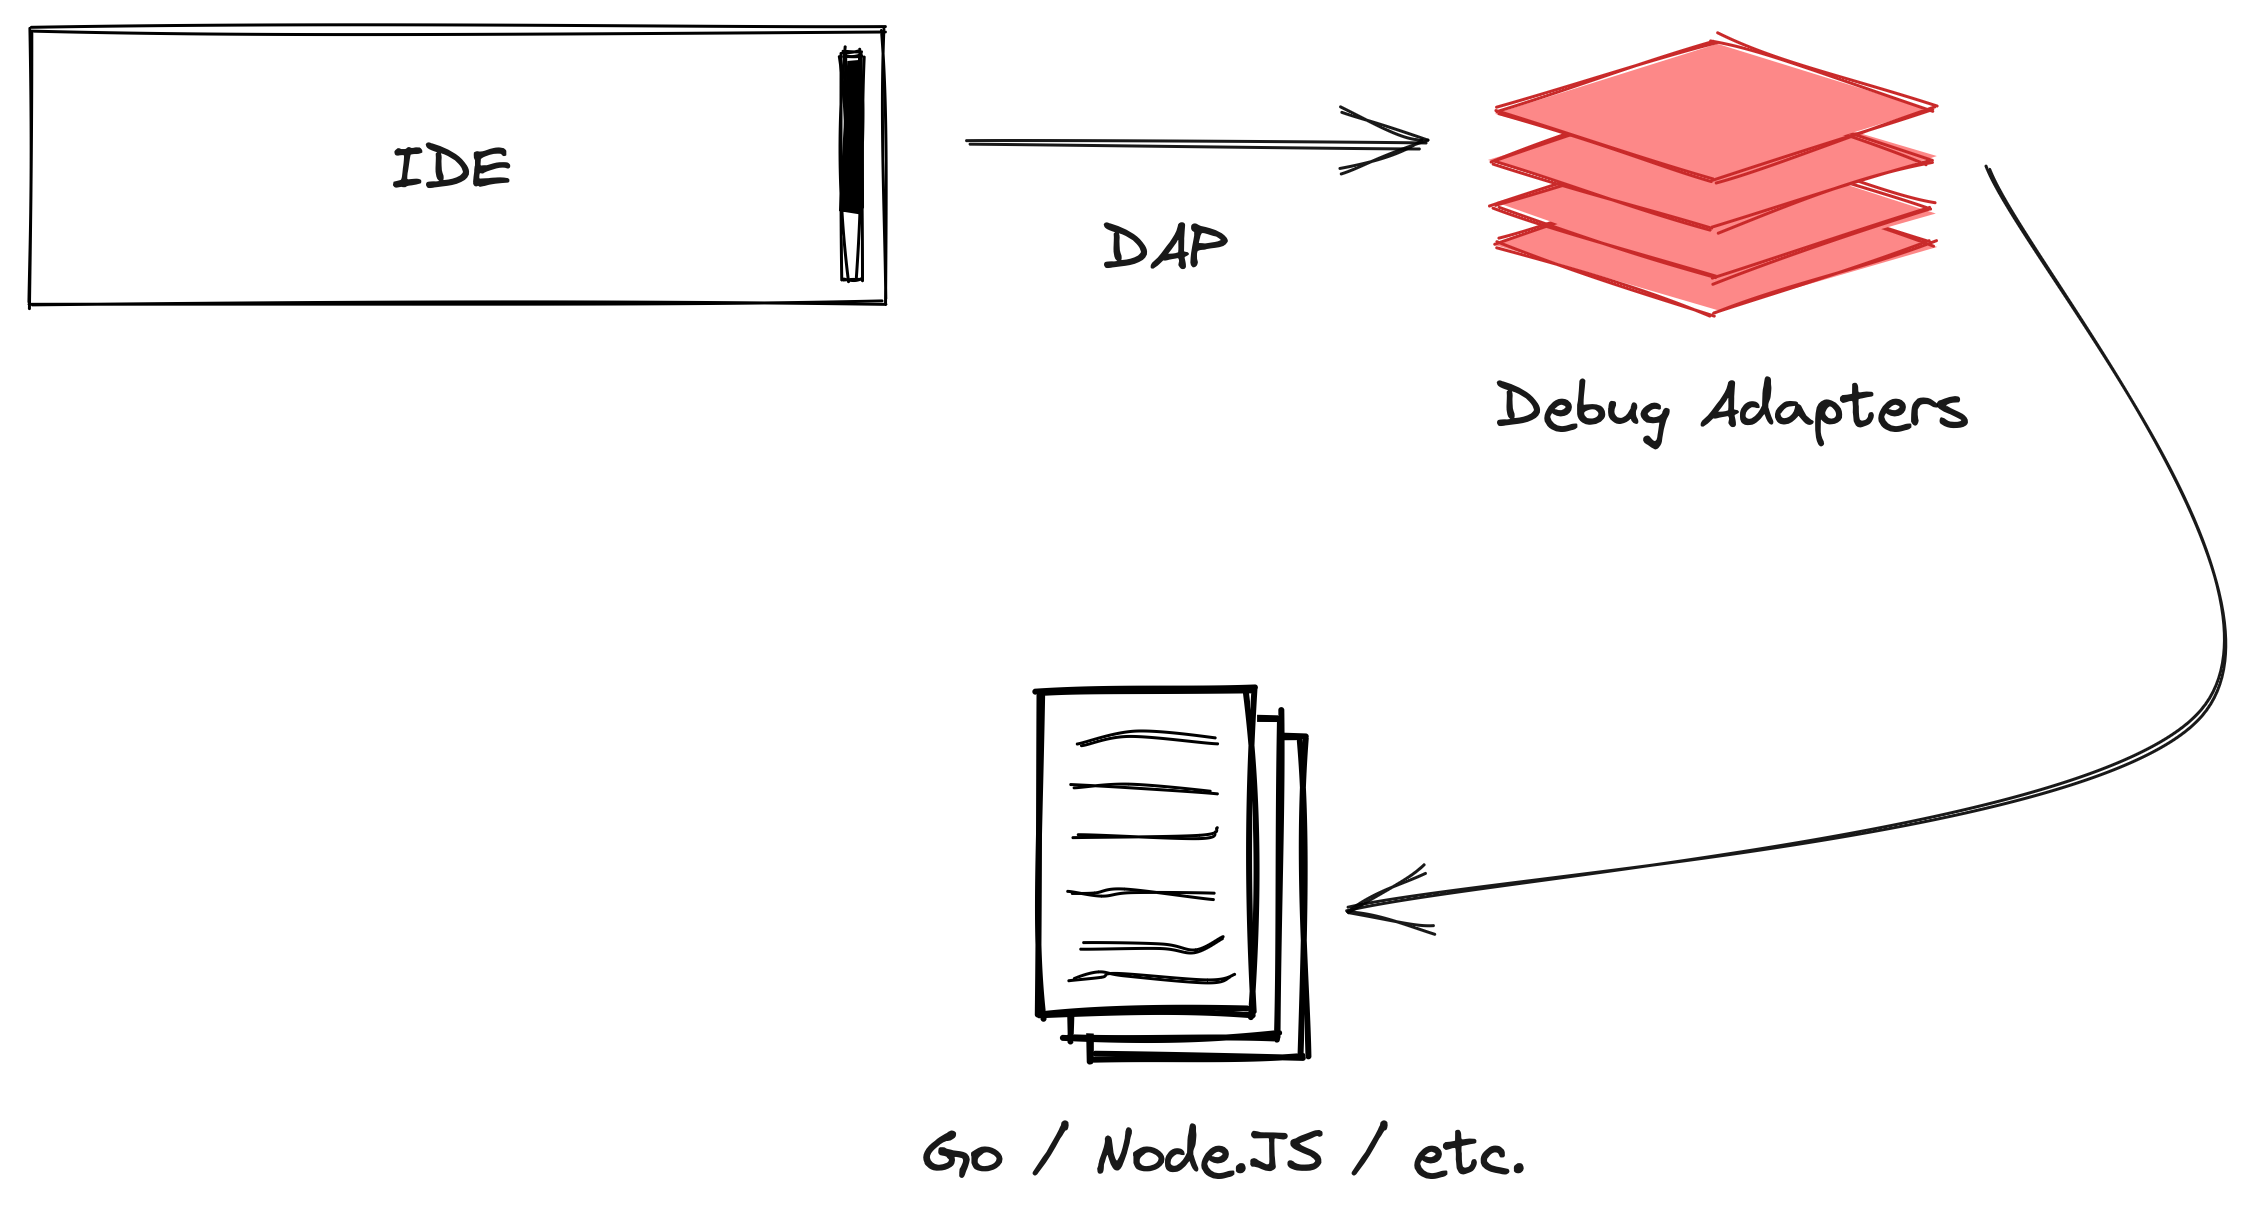
While DAP was meant to enable debug adapters as a layer in between, its success has triggered adoption in debuggers directly, overshooting the stated project goal. Delve has a native DAP implementation and can act as a DAP server. It also has its own protocol implementation that stems from before DAP adoption and can serve both protocols as a server. We will focus on DAP for this blog post since it is a (somewhat) new and emerging standard. For adaption into other language stacks, the Delve protocol is not interesting at all.
The interesting bit about DAP (and Delve’s own protocol) is that it is networked. This means we can suddenly traverse network boundaries when starting a debugging session! We can launch a debugging session on the system running the application (i.e. in Kubernetes) and then connect to it via a remote client (i.e. our local system).
We will use that to our advantage, since we prefer integrating debug sessions with our usual development tools. But to do so, we need an active debugger to connect to. Next, we will take a look at how to get the debugger (with a DAP server onboard) into Kubernetes in the first place.
A primer on ephemeral containers
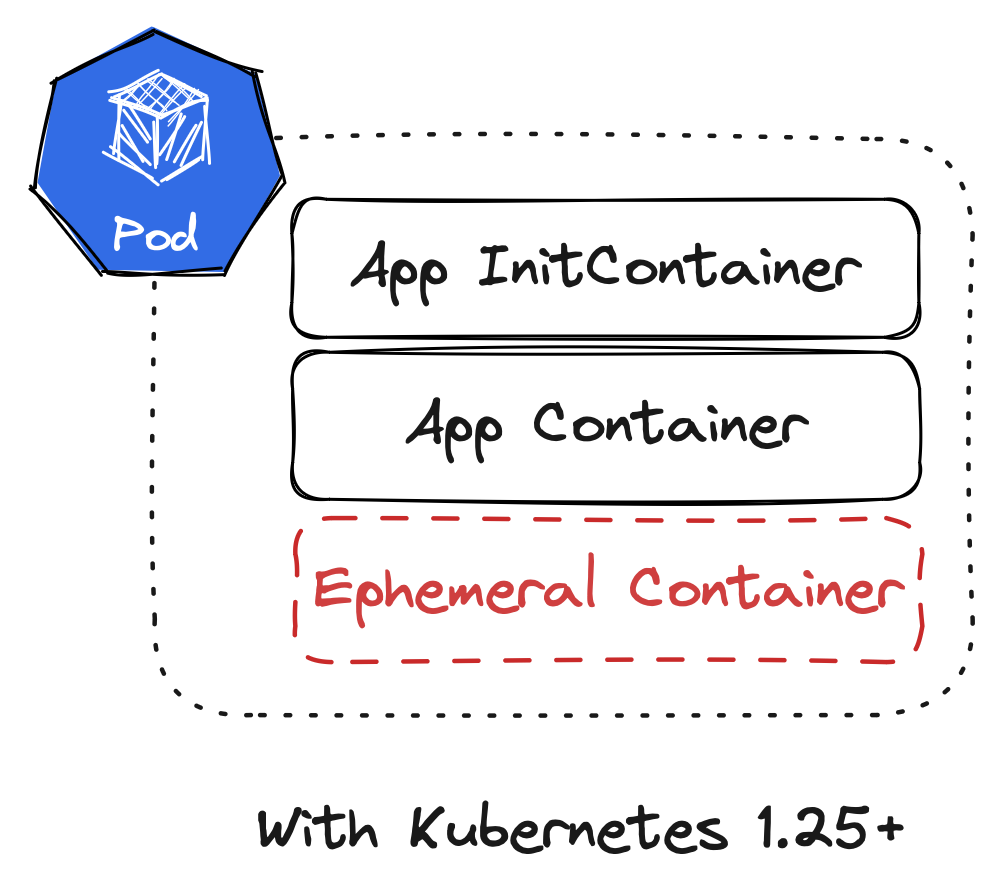
Ephemeral containers are a feature in Kubernetes that became generally available in Kubernetes 1.25. Before ephemeral containers, there were two types of containers in a Pod specification: InitContainers and (normal) containers. InitContainers run before the “normal” containers at Pod startup to execute some initialisation logic (note this is also changing with sidecar patterns available in InitContainers). But both types of containers needed to be defined in the Pod specification when creating the Pod. Pods were more or less immutable, we could not change them once they were created.

This changes with ephemeral containers! Ephemeral containers are part of the Pod specification but are implemented as a subresource. And most importantly the list of ephemeral containers can be amended while the Pod is running. In fact, we can only create ephemeral containers while the Pod is running since subresources cannot be created at the same time as the actual resource.
Command line tooling
Since we established that we will need some special tooling to interact with the ephemeralContainers subresource on a Pod, let’s look at our options.
The obvious candidate is kubectl. Thankfully, it got us covered! kubectl debug is available as a command in the kubectl (kube-control? kube-cuttle? kube-c-t-l?) toolbox. It allows us to launch ephemeral containers into specific Pods.
$ kubectl debug <pod> -it --image=busybox --target=<container>
With the example above, an ephemeral container using the busybox image (--image) is attached to the specified Pod <pod>. It also connects the ephemeral container to a specific <container> (--target), which means that we break down the isolation between containers so the ephemeral container can access the process namespace of the target one. We also tell kubectl debug to drop us into an interactive shell in the ephemeral container (-i and -t).
kubectl debug is a very powerful toolbox for debugging in Kubernetes! If we choose to provide a special build of our application image (as discussed earlier), we cannot debug a “live” Pod. But we can use --copy-to and --set-image to
- create a new Pod from the “template” of a currently running Pod and
- override the image used for the application container to a debug-enabled image
which could be used to run a variant of this debug workflow against a Pod copy.
Debugging profiles
As established earlier, a debugger needs CAP_SYS_PTRACE (essentially by definition). By default a container does not have this capability, and for good reason!
But kubectl debug comes with a flag called --profile that helps with setting the right security configuration on the ephemeral container. This is a fairly recent addition, so not all use cases might be covered and it’s not always easy to figure out what a profile exactly provides, but for us, it is sufficient.
What we need is --profile=general, since it provides CAP_SYS_PTRACE and nothing more. Easy peasy.
As a minor side note: When I started working on this topic not everything was as polished as it is today. Because profiles were not yet available in kubectl debug, I had to develop my own little kubectl plugin called kubectl-ephemeral. It allows usage of the full API for the EphemeralContainer type to create ephemeral containers, which might prove useful if no profile provides the necessary configuration. Usually, we want kubectl debug though.
Delve as ephemeral container
Now we have everything that we need in building blocks. Let’s put it together! In this case, I am debugging a sample application that is a simple Go web server. It is already running in Kubernetes. We now want to create an ephemeral container in one of the Pods for that application. The ephemeral container should start Delve, attach to the application, and open a DAP server port.
$ kubectl debug \
    --profile=general \
    --target=sample-app \
    --image=quay.io/embik/dlv:v1.20.1 \
    sample-app-[...] \
    -- dlv --listen=127.0.0.1:2345 --headless=true attach 1
There we go. We attach to process id 1 because that is the process which started in the target container. Since we are connected to the PID namespace of the target container, we can just target the initial process - This only works if our target container does not have another entrypoint than the application binary.
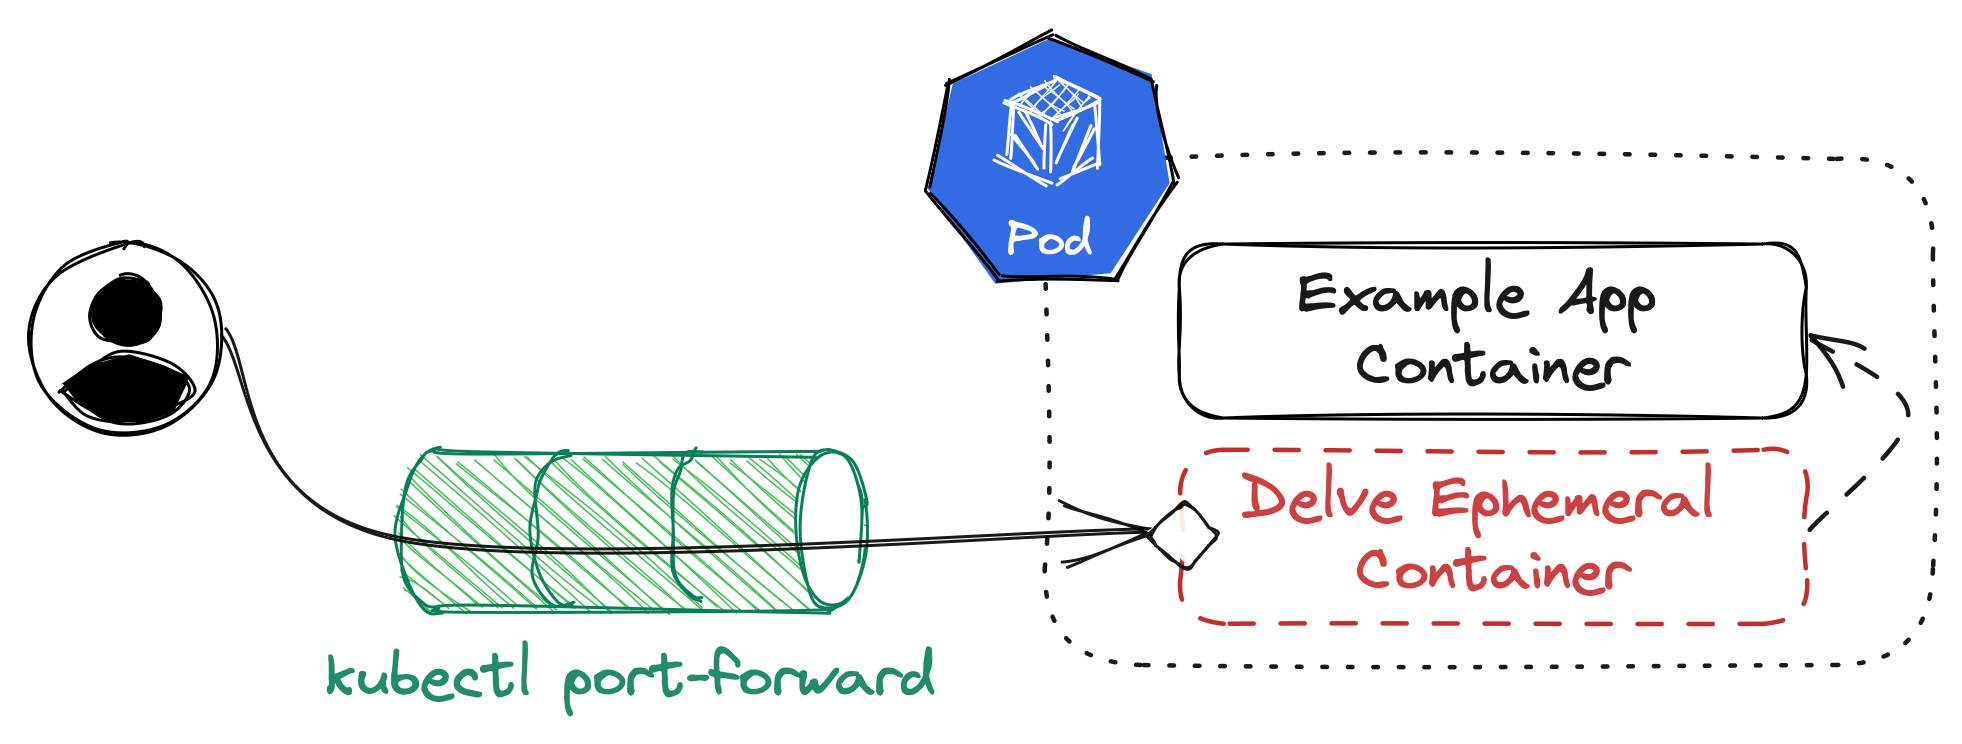
One last thing though: We opened the DAP server on 127.0.0.1:2345. That’s not accessible from outside the Pod! How are we supposed to connect our client to that? And how do we keep this port secured as DAP knows no authentication?
Thankfully, kubectl port-forward helps us close that last gap. It does not need a port definition in our PodSpec, it works ad-hoc. Which means we can simply run
$ kubectl port-forward pod/sample-app-[...] 2345
which opens port 2345 on our local system and forwards it to the port within our Pod that has Delve running. This is our setup visualized:
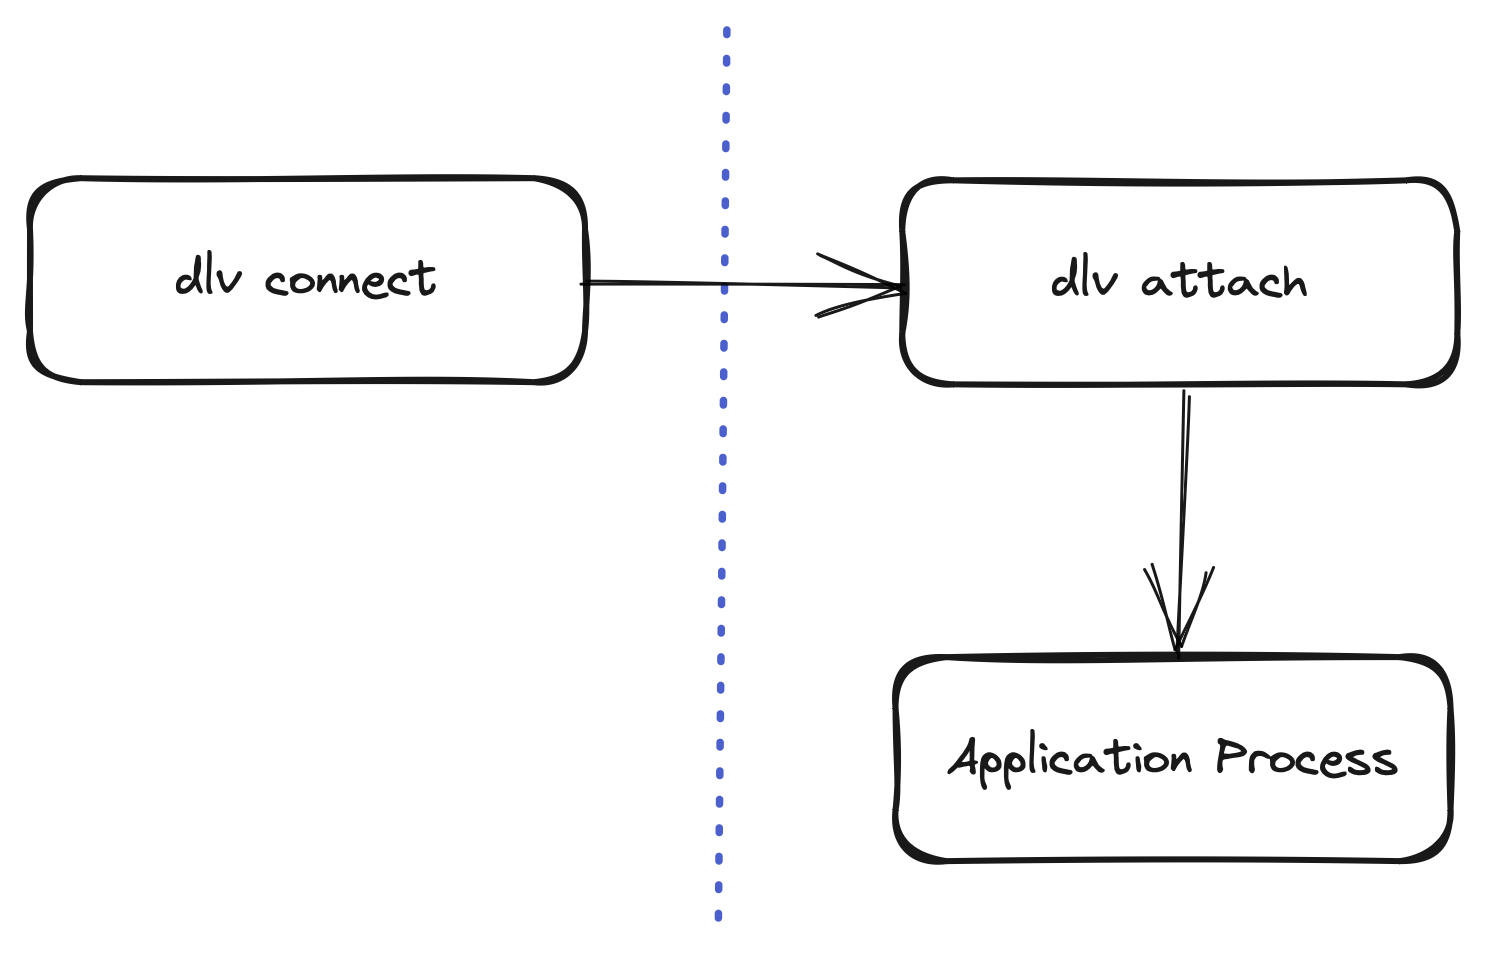
To validate that our setup is running, try connecting to the local port with dlv connect:
$ dlv connect localhost:2345
If everything is working, this will connect us to the remote instance of Delve running in Kubernetes. From here, we can use the interactive shell of dlv to start debugging!
But we started out with the promise of integration into our workflows - And while the command line might be part of our usual workflow in developing software, we can do better than that.
Remote debugging with VS Code
Since we have a working connection to the Delve headless server instance in our ephemeral container now, we can use a DAP client of our choice to connect to it. The most popular DAP client - by a mile or two, probably - is Visual Studio Code (VS Code). It also happens to be one of the more popular editors out there.
To configure VS Code to talk to Delve, we can drop a launch.json configuration file into the .vscode directory of our project (if the folder does not exist, we need to create it). VS Code will read it as a project-specific debugging configuration.
This - or something similar - is the file for my example project:
{
  "version": "0.2.0",
  "configurations": [
    {
      "name": "Remote Attach",
      "type": "go",
      "request": "attach",
      "debugAdapter": "dlv-dap",
      "mode": "remote",
      "substitutePath": [
        { "from": "${workspaceFolder}", "to": "/build" }
      ],
      "port": 2345,
      "host": "127.0.0.1"
	}
  ]
}
All of this is important to configure the connection to a running debugger, but we care mostly about type being set to "go" (since we are debugging Go code), debugAdapter set to "dlv-dap" (so VS Code knows it will talk to Delve via DAP), port and host referencing the local port-forwarding we have opened, and - most importantly - substitutePath set correctly.
Because Go embeds the full path in its debugging information (unless we trim paths), we need to tell VS Code about the original path that the binary was built in. In our case, this might have been /build, the working directory set in our Dockerfile. Therefore, we instruct VS Code to rewrite path information when interacting with the debugger from our current workspace folder to /build.
Once this is done, VS Code will offer the new debugging mode called Remote Attach from its debugging screen via the green play button. For a detailed overview of debugging capabilities in VS Code please check out the official documentation.
Closing thoughts
Phew, that was a lot. Hopefully this overview helps with designing a personal debugging workflow in Kubernetes. This was not meant as a step by step tutorial, but more of a showcasing for what ephemeral containers can do. Maybe it can serve as basis for additional, similar workflows.
I think it is clear from the full text that this is not an outright recommendation. A lot of preconditions need to be taken into consideration before a debugging session in Kubernetes will work. If they can be fulfilled, Delve can really help with figuring out deeply rooted bugs in an application.
Thank you to my personal editor for reviewing and improving this post!