After finally receiving the third Raspberry Pi and additional pieces of hardware (and being busy with, well, life) I was able to move to the next part of this blog series: Setting up Kubernetes with KubeOne (full disclosure: KubeOne is developed by my employer Kubermatic) and adding a hyperconverged storage layer to the cluster. For that I am using Longhorn. This post will focus on the cluster setup, while the next post will discuss Longhorn and the distributed storage aspect.


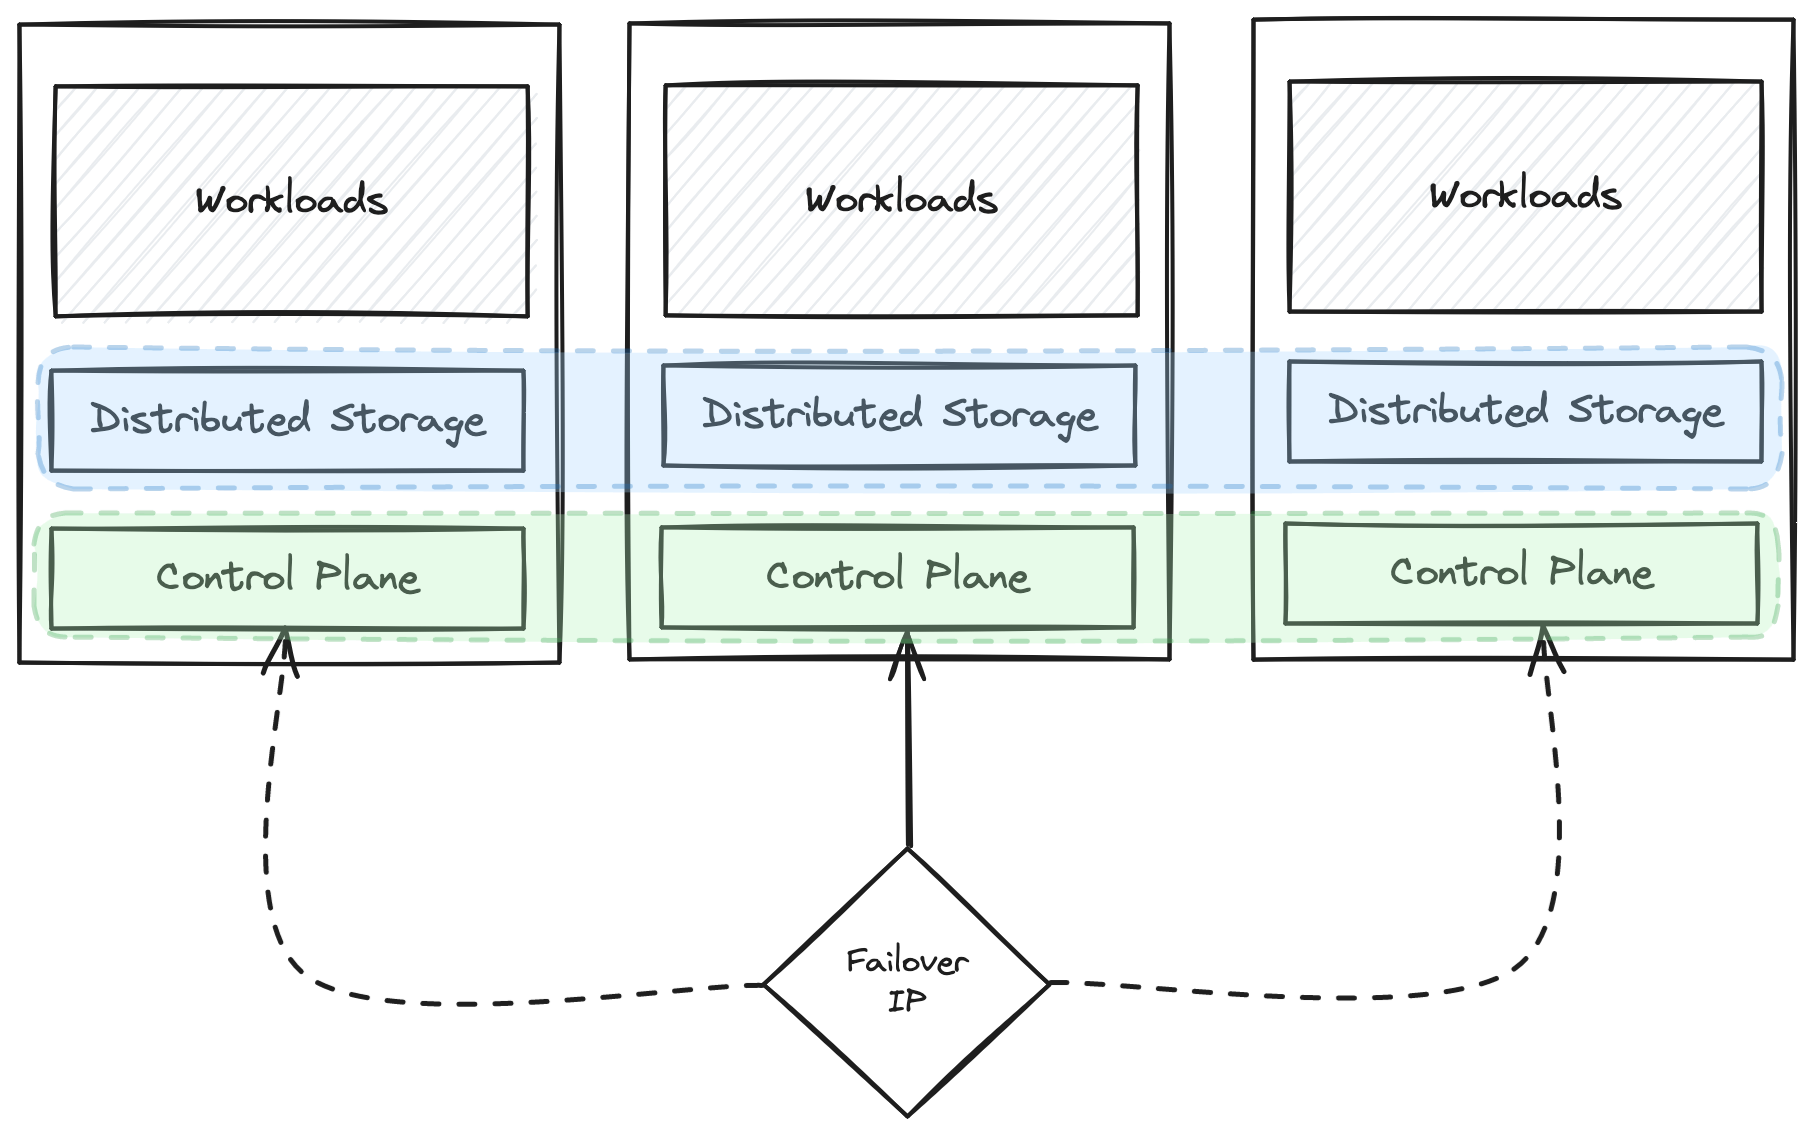
Quick visualization of the desired cluster setup.
One requirement I had for the setup: Any of the three Raspberry Pis are allowed to fail and the cluster stays up and running. High Availability might be a little overkill for a home setup, but this one breaks with so many best practices already (you will see later in this post and the series) that – at least – it should always stay up, even if one node goes down.
During the initial setup, some of the systems occasionally lost connection to their disk and the system crashed. So far, I haven’t figured out if the cause is one of the hats (e.g. PoE not delivering enough power for a short period), but this meant the cluster needed to be resilient to node failure.
Let’s dive right in.
This post is part of a blog post series describing my Kubernetes Homelab.
- Part 1: Raspberry Pi Setup
- Part 2: Cluster Installation with KubeOne (this post)
- TBD: Hyperconverged Storage with Longhorn
- TBD: Exposing Cluster and Services through Tailscale
If you skipped the first part, I’d recommend to go back and at least read the post-boot steps. Without applying them to the Raspberry Pis they cannot be used as Kubernetes nodes.
I’m using KubeOne over similar tools like k3s because I’m already familiar with it. Its declarative approach to cluster setups feels very similiar to Cluster API without the need to have a management cluster. Let’s also be honest – These machines are no longer embedded devices, which are k3s’ targets. They have the CPU and memory footprint of a large instance on AWS, after all.
Virtual IP for Kubernetes API
The first thing I needed was a virtual IP for the Kubernetes API. Why? Because the nodes of the Kubernetes cluster try to reach the cluster’s control plane. The Kubernetes API is the beating heart of the cluster and all control plane data (i.e. which pods are scheduled onto which node, the status of pods, etc) flows through it. Seriously, it’s a pretty amazing apparatus.
Anyway – to make sure that nodes can reach the Kubernetes API, no matter where it runs (since there will be three nodes acting as control plane and worker), we need a failover mechanism for an unchanging IP. For that purpose I am using keepalived. keepalived uses VRRP (Virtual Router Redundancy Protocol) to determine that it needs to take over a static IP address and attach it to its own network interface. The details of how this works are quite important, but out of scope for this post.
Usually keepalived is available from distribution repositories, so it only needs this:
$ apt install keepalived
To make sure it starts at boot (e.g. after a crash):
$ systemctl enable keepalived.service
keepalived Configuration
For this setup, keepalived needs two files: A configuration file and a script to check if the Kubernetes API is healthy. Thankfully KubeOne already provides a vSphere example from which I could lift the keepalived parts.
Here is the check_apiserver.sh script:
#!/bin/sh

errorExit() {
    echo "*** $*" 1>&2
    exit 1
}

curl --silent --max-time 2 --insecure https://localhost:6443/healthz -o /dev/null || errorExit "Error GET https://localhost:6443/healthz"
if ip addr | grep -q 192.168.178.201; then
    curl --silent --max-time 2 --insecure https://192.168.178.201:6443/healthz -o /dev/null || errorExit "Error GET https://192.168.178.201:6443/healthz"
fi
This script first checks if the Kubernetes API is up and running on port 6443 of localhost, and if the local system also holds the virtual IP it will also check if the Kubernetes API is reachable on port 6443 of said virtual IP.
Now comes the configuration file. keepalived instances require a shared secret, so I generated one via:
$ tr -dc A-Za-z0-9 </dev/urandom | head -c 8; echo
Configuration slightly differs between master and backup instances. The file deployed to raspi-01, which I wanted to be my “default” instance (so, the master, in keepalived terminology), looks like this:
lobal_defs {
    router_id LVS_DEVEL
    script_user root
    enable_script_security
}

vrrp_script check_apiserver {
  script "/etc/keepalived/check_apiserver.sh"
  interval 3
  weight -2
  fall 10
  rise 2
}

vrrp_instance VI_1 {
    state MASTER
    interface eth0
    virtual_router_id 55
    priority 100
    unicast_src_ip 192.168.178.93

    authentication {
        auth_type PASS
        auth_pass <password> # <- this needs to be replaced!
    }

    virtual_ipaddress {
        192.168.178.201/24
    }

    track_script {
        check_apiserver
    }
}
I’m honestly not a keepalived expert, so this configuration is kind of “best effort”. For raspi-02 and raspi-03, the file looks mostly the same:
# ...
vrrp_instance VI_1 {
    state BACKUP
    interface eth0
    virtual_router_id 55
    priority 80 # <- respectively 75, for raspi-03
    # ...
}
# ...
Those files are written to /etc/keepalived/keepalived.conf. Starting keepalived on all machines was necessary to get the virtual IP, so I ran this command on all of them:
$ systemctl start keepalived.service
Kubernetes Setup
KubeOne is a command line tool for Linux and macOS that bootstraps a Kubernetes cluster from a declarative configuration file. It has integration with Terraform/OpenTofu to let the Infrastructure-as-Code (IaC) software handle creation of VMs and ingest IaC output to install Kubernetes. Provisioning of machines as Kubernetes nodes happens via SSH. It’s licensed under Apache-2.0, so it’s free to use (and fork).
The easiest way to install KubeOne is:
$ curl -sfL https://get.kubeone.io | sh
If piping an unknown bash script to your shell is making you uncomfortable, binaries are also available from GitHub releases directly. I also maintain a small homebrew tap that includes a kubeone formula.
KubeOne Configuration
Once (or before) KubeOne was installed I had to craft a declarative configuration for it. Below is the complete configuration file (kubeone.yaml) I used to run KubeOne and set up a Kubernetes cluster across the three Raspberry Pis (if you are looking for more instructions on how to set up this configuration, the KubeOne documentation might be helpful):
apiVersion: kubeone.k8c.io/v1beta2
kind: KubeOneCluster
name: raspi
versions:
  kubernetes: '1.29.8'
cloudProvider:
  none: {}

controlPlane:
  hosts:
    # raspi-01
    - publicAddress: '192.168.178.93'
      privateAddress: '192.168.178.93'
      sshUsername: embik
      taints: []
    # raspi-02
    - publicAddress: '192.168.178.98'
      privateAddress: '192.168.178.98'
      sshUsername: embik
      taints: []
    # raspi-03
    - publicAddress: '192.168.178.104'
      privateAddress: '192.168.178.104'
      sshUsername: embik
      taints: []

apiEndpoint:
  host: '192.168.178.201'
  port: 6443

machineController:
  deploy: false
The gist of this file is: Please create a Kubernetes cluster with version 1.29.8, use three machines as control planes and configure them to use the virtual IP as Kubernetes API endpoint.
Let’s look at this file in detail. We’ll go top to bottom, starting with this:
apiVersion: kubeone.k8c.io/v1beta2
kind: KubeOneCluster
name: raspi
# ...
KubeOne configuration files look similar to Kubernetes manifests on purpose – both work declaratively, and the configuration file reflects that. What is described above is the target state of the cluster, and I want KubeOne to bring the three Raspberry Pis to that state. I don’t care how. Because of that, the “header” of the file looks pretty similar to a Kubernetes object, defining the API version and the cluster name (raspi).
# ...
versions:
  kubernetes: '1.29.8'
# ...
This is the Kubernetes version that should be installed onto the machines. In subsequent runs, updating this (e.g. to Kubernetes 1.30.x) will prompt KubeOne to run a minor version upgrade. Support for minor Kubernetes versions in KubeOne is documented here.
# ...
cloudProvider:
  none: {}
# ...
KubeOne supports integration with various cloud providers. Because this is a bare-metal setup, there is no cloud provider to integrate with, and thus the selected cloud provider is none.
# ...
controlPlane:
  hosts:
    # raspi-01
    - publicAddress: '192.168.178.93'
      privateAddress: '192.168.178.93'
      sshUsername: embik
      taints: []
    # raspi-02
    - publicAddress: '192.168.178.98'
      privateAddress: '192.168.178.98'
      sshUsername: embik
      taints: []
    # raspi-03
    - publicAddress: '192.168.178.104'
      privateAddress: '192.168.178.104'
      sshUsername: embik
      taints: []
# ...
This is the list of machines that are supposed to form the Kubernetes cluster once KubeOne is done with its work. I’m passing their IP addresses as both public and private (since there is no internal/external network, a Raspberry Pi doesn’t have two ethernet connectors) and my SSH username. That way, KubeOne will use my SSH agent to connect to these machines to bootstrap and configure them appropriately.
One note should be on taints: [] for each list entry. Usually, a Kubernetes control plane has something called taints applied to them on setup; Taints provide a way to mark nodes as not suitable for scheduling unless a toleration for the taint is configured on a Pod. For this setup, everything has to run on the three nodes that serve as control plane – there are no other machines. Therefore, I’m instructing KubeOne to not apply any taints to them.
# ...
apiEndpoint:
  host: '192.168.178.201'
  port: 6443
# ...
This configures all machines to use 192.168.178.201 as the Kubernetes API endpoint (even control plane nodes need to check in with the central Kubernetes API). This is made possible by the previous work on allocating a virtual IP through keepalived.
# ...
machineController:
  deploy: false
Because this is not a cloud environment, there is no way to dynamically provision machines (well, something like Tinkerbell allows to do so, but I wasn’t planning on buying more hardware [for the moment]). machine-controller is a suplimentary component we develop at Kubermatic which allows dynamic provisioning, but since I have no use for it, it’s not deployed.
Running KubeOne
With everything ready, the only thing left was flipping the switch. So I flipped the switch:
$ kubeone apply -m kubeone.yaml
KubeOne connects to the given machines, discovers their current status and then determines which steps should be taken. Before doing so, it asks for confirmation.
INFO[10:22:11 CEST] Determine hostname…
INFO[10:22:18 CEST] Determine operating system…
INFO[10:22:20 CEST] Running host probes…
The following actions will be taken:
Run with --verbose flag for more information.
  + initialize control plane node "raspi-01" (192.168.178.93) using 1.29.8
  + join control plane node "raspi-02" (192.168.178.98) using 1.29.8
  + join control plane node "raspi-03" (192.168.178.104) using 1.29.8

Do you want to proceed (yes/no):
After confirming, KubeOne does its thing for a couple of minutes.
...
INFO[10:32:54 CEST] Downloading kubeconfig…
INFO[10:32:54 CEST] Restarting unhealthy API servers if needed...
INFO[10:32:54 CEST] Ensure node local DNS cache…
INFO[10:32:54 CEST] Activating additional features…
INFO[10:32:56 CEST] Applying canal CNI plugin…
INFO[10:33:10 CEST] Skipping creating credentials secret because cloud provider is none.
Cluster provisioning finishes at this point. KubeOne leaves a little present in its wake, a kubeconfig file created in the working directory. In my case, that was raspi-kubeconfig. This is the “admin” kubeconfig to access the fresh cluster. And indeed, checking up on the cluster is possible now:
$ export KUBECONFIG=$(pwd)/raspi-kubeconfig # use raspi-kubeconfig as active kubeconfig
$ kubectl get pods -n kube-system
NAME                                       READY   STATUS    RESTARTS   AGE
calico-kube-controllers-699d6d8b48-mgkp4   1/1     Running   0          10m
canal-4dmvq                                2/2     Running   0          10m
canal-ddn8v                                2/2     Running   0          10m
canal-j46lz                                2/2     Running   0          10m
coredns-646d7c4457-s95hd                   1/1     Running   0          10m
coredns-646d7c4457-w48zx                   1/1     Running   0          10m
etcd-rpi-01                                1/1     Running   0          10m
etcd-rpi-02                                1/1     Running   0          10m
etcd-rpi-03                                1/1     Running   0          10m
kube-apiserver-rpi-01                      1/1     Running   0          10m
kube-apiserver-rpi-02                      1/1     Running   0          10m
kube-apiserver-rpi-03                      1/1     Running   0          10m
# ...
It’s alive, Jim!
This concludes the second part of my Kubernetes homelab series. At this point, I had a functional Kubernetes cluster, but a couple of open questions remained: Where would stateful applications store their data? How could I access any applications running within this cluster? These questions will be addressed in part three and four of this series, which I will hopefully write quicker than this one. Stay tuned!